There are two ways to use PC*MILER Web Services Spreadsheets in Excel—type a formula directly into a cell or use the Insert Function option. All formulas will accept strings for city name, and either strings or integers for ZIP codes. Below is an overview on how to use Web Services Spreadsheets formulas.
In this article:
Step 1: Format Cells
Columns must be formatted correctly so they can be read. This is especially important when importing postal codes—if your columns are not properly formatted, the default spreadsheet format (“General”) will cause the first zero to be dropped from postal codes that begin with zero. Also, columns containing calculated distances should be formatted so the desired number of decimal places appears.
To format columns:
1. Highlight a column you wish to format.
2. Right-click the column and select Format Cells….
3. In the Number tab under Category, highlight Number, Text, Currency, or Special > Zip Code, depending on the type of data the cells will contain.
4. Set the options you want for each category; for example, the number of decimal places in the Number format. Click OK when done.
5. Repeat for all columns that you will be using.
Step 2: Add a Formula
To add a formula using the Excel Insert Function:
1. Select a cell, then select the Formulas tab > Insert Function menu command or click the fx speed button above the column headers.
2. Select a formula from the User Defined function category and click OK. All PC*MILER Web Services Spreadsheets functions available through the Add-in are listed in the User Defined category.
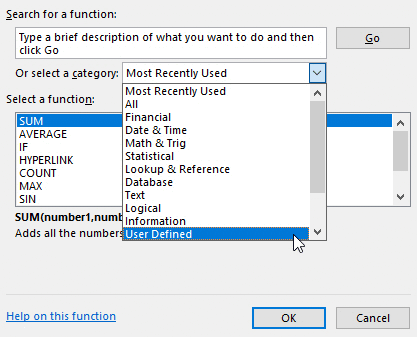
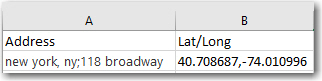
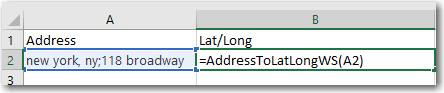
3. Enter cell references or other data in the Function Arguments window, and click OK when done. In the example below, the function AddresstoLatLongWS gets the latitude/longitude for a street address.

Note: Each function has required arguments and optional arguments that you can select to customize your results. Please see the individual function descriptions in this guide for more information.
To add a formula directly into a cell:
1. Type in the formula and cell reference or other data and hit <Enter>.
To apply a formula to multiple cells:
As with any Excel function, you can also click and drag a PC*MILER Web Services formula to apply to multiple cells in a column or a row.
1. Select a cell or group of cells.
2. Click on the square in the bottom right corner of your selection.
3. Drag down or across the target column(s) or row(s).

Step 3: Enter Arguments
A function will produce a result as long as you enter its required arguments. Several functions also include optional arguments that you can enter to enhance your results.
For example, the syntax for the =MilesWS function, which calculates the mileage between an origin and distance, is:
=MilesWS (origin, destination, routetype, dims, units, LCV, dataversion, traffic)
Only the origin and the destination are required to generate the mileage; the other arguments are optional. You can pick and choose which optional arguments you'd like to include in calculations using cell references, separated by commas. Leaving empty any arguments you don't want to include.
Examples
MilesWS(B1,C1) would take the locations in B1 and C1 and generate mileage.
MilesWS(B1,C1,D1) would take the locations in B1 and C1, and route type in D1, and generate mileage.
MilesWS(B1,C1,,,,,,D1) would take the locations in B1 and C1, apply the traffic setting in D1, and generate mileage.
