First install the resident AS/400 software on your AS/400. Sign on to QSECOFR or an account with equivalent authorities. Place the CD in the optical drive and follow the instructions below.
If you are upgrading your ALKWIN or ALKTLL Library from an earlier version of PC*MILER, it is recommended that you rename your current ALKWIN [or ALKTLL] Library or clear your current library with the CLRLIB command.
Before clearing your current library, type ‘config’ or ‘tllfig’ from the AS/400 command line and write down your current default settings. These settings will be overwritten during the library restore. After the restore of the library, re-enter these settings by running the ALKWIN/CONFIG command.
Installation Steps
1. Create a library with the CRTLIB command. Type CRTLIB ALKWIN [or ALKTLL].
2. Add the library to the current library list. Type ADDLIBLE ALKWIN [or ALKTLL].
(The following paragraph does not apply to installations that include PC*MILER|Tolls.)
For Innovative Computing Corporation installations, you will also need your ICC WORK and FILE libraries in your current library list. For Version R6, type ADDLIBLE I93FILE or ITSR6FILE and then ADDLIBLE I93WORK or ITSR6WORK. The ICC Version 7 libraries are IESR7WORK and IESR7FILE. (Call ICC if you don’t know which version you are running.)
3. Command for restoring from CD:
rstlib savlib(alkwin) dev(opt02) vol(alkwin) mbropt(*all) alwobjdif(*all) rstlib(alkwin)
or
rstlib savlib(alktll) dev(opt02) vol(alktll) mbropt(*all) alwobjdif(*all) rstlib(alktll)
where opt02 is your CD-ROM drive. Make sure all objects were restored. You can ignore security warning messages. It is okay if MIDQUE does not restore because this file is created later on.
NOTE: The ALKWIN [or ALKTLL] Library CD was created using Kisco Information Systems’ BlueCD, which allows you to create AS400 readable SAVLIBs on a PC CD writer. A small percentage of users may have difficulty restoring the ALKWIN [or ALKTLL] Library with the above command. If you experience problems, type RSTLIB, then:
Specify the library ALKWIN [or ALKTLL] and the appropriate optical device
b. Press <F10> for more options
c. Specify *ALL on database member options
d. Specify *ALL on allow object differences.
4. The system administrator should make the library ALKWIN or ALKTLL available to users at sign-on time. There are two ways to insert ALKWIN [or ALKTLL] into the library list:
- The WRKSYSVAL command can be used by typing WRKSYSVAL, and then searching for the QUSRLIBL entry. Insert ALKWIN [or ALKTLL].
- If your users are using a job description in their user profiles, then use the CHGJOBD command (type CHGJOBD) and insert ALKWIN or ALKTLL.
For Innovative Computing installations, a command is available to help insert a library into the library list. ALKWIN should be the first library in the library list. (NOTE: Run this command from a typical ICC user account or profile, not QSECOFR). Enter the following:
ADDLIBLE ILPGMR *LAST
CHGLIBLS
(insert) ALKWIN [or ALKTLL]
5. To grant object authority to library ALKWIN, enter the following:
GRTOBJAUT (press <F4>)
object = *ALL
library = ALKWIN [or ALKTLL]
objtype = *ALL
users = *public
authority = *ALL
For ICC Users only (Be sure to do this!)
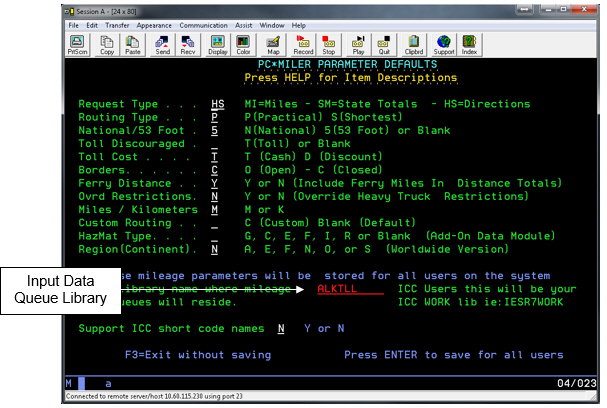
Type config from the AS/400 command line after the restore of the library and change the library for the location of mileage data queues from ALKWIN to your ICC Work library and change the ICC Support Short Code names flag from ‘N’ to ‘Y’.
Depending on the version of your ICC software your library will be I93WORK, ITSR6WORK, or IESR7WORK. Check with ICC for this name. For ICC R8 and multiple company installations use ALKWIN. Do not configure an installation that includes the PC*MILER|Tolls component to point at an ALKWIN or ICC library.
NOTE: The AS/400 side and the PC Side must match which Library the Mileage Request or Input data queue resides in. You will be prompted during the PC Side Installation for your data queue location or there is an option to change it under the PC*MILER-AS/400 Control Menu which is an option in the File drop down menu.
For PC*MILER

For Tolls