To generate distances and directions for a route, you need to specify at least two stops – an origin and destination. An unlimited number of stops may be entered.
PC*MILER will always treat the stop at the top of the stop list as the origin of the route and the last stop on the list as the destination, unless you are generating hub distances. As you add stops, each one will be placed below the previous stop on the list, creating the stop order from origin to destination.
To enter a stop
- Check that you have the proper region selected.
- Select the Routes tab > New Route or the Ctrl+N keys.
- Make a selection in the stop format drop-down.
- In the City field of the new route window, type a location using any valid format; a street address can be included in the Address field if Streets add-on is installed.
- Click Add Stop or press the Enter key on your keyboard.
- If a pick list of locations appears, highlight your choice and click OK. If the location you entered is valid, the stop will appear above the City field in a stop list. For a stop to be valid, there must be a match in the PC*MILER database.
- For more specific routing, you can also enter an arrival or departure time, and set options for a route.
To have PC*MILER pick a default postal code or address
- Select the File menu > Application Settings > Geocoding.
- Uncheck Provide Pick List.
- Click Save.
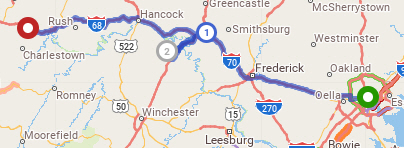
Stops on the Map
Stops are represented on the map by circle icons with borders of different colors: green for the origin of a trip and red for the destination, deep blue for a stop, light blue for an HOS rest stop, and gray for a waypoint. By default, each stop is labeled with the name, address (if entered) and ZIP code of the location, or its latitude/longitude position.
Stop labels can be toggled on/off by selecting the Map tab > Stop Labels, or by selecting Stop Labels in the right mouse menu.